Sunday, July 29, 2012

Thoughts on a Sunday Evening


When I was a girl, I used to think that when I got this old...  all I would do would be sit in a rocking chair on the front porch and wait for the grandchildren to visit or the neighbors to drop by...


My social life would consist of visiting over the back fence...


...and other such "excitement."


So, what did I do today?


... and tomorrow, I'll be...


I think I had it wrong all those years ago....


Pottering Around


After running four errands and arriving back home at 9:17 a.m. yesterday morning, I gave into the influence of several bloggers I follow and started making a scarf for a Christmas present.  I used Red Heart Boutique: Sashay... a new yarn that's out because I always like a challenge!

The yarn looks like a type of ribbon but spread open, it looks like this...


There is a video on the Red Heart website that shows how to work with this yarn... a good thing because the instructions that came with the yarn are pretty sketchy.... at least for a knitter like me. 


I worked on my scarf off and on all day and have gotten this far...


I also worked on sewing hourglass blocks together and finished three more 4x4 sections.   I also have the next three blocks on the design wall ready to go today.


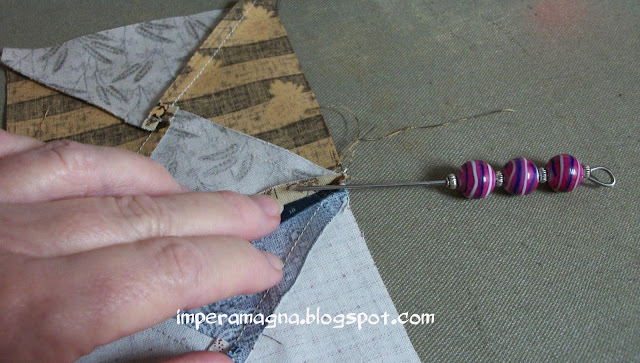
While sewing the blocks together, I used one of my stilettos....  which really helped feed corner edges under the presser foot.


The stiletto was also helpful opening those pesky little 1/4" seams when pressing.


I haven't used my mini design boards yet.... but that is only a matter of time!


Saturday, July 28, 2012

Drum Roll Please!


The winner of her choice of stiletto...


 is......


Congratulations, JoAnne!  I've emailed you for your snail mail address and will ship your stiletto to you as soon as I hear back from you.


I will be saving the other stilettos as a little something extra in future give-aways!   I also picked up some another package of turkey lacers because making these was fun...


Friday, July 27, 2012

Mini Design Boards


I found a wonderful set of tutorials by Lori Holt of Bee In My Bonnet to make mini design boards!  And you just know I had to make me a couple...

My sister Carol and I visited the new Hobby Lobby while she was here... the first visit to any Hobby Lobby for both of us!  (We were there for almost 2 hours!)  I found some art foam board with adhesive backing...


Lori posted that you can get 6 - 10x10 inch design boards from a 20x30 inch art foam board, which were perfect for her Farmer's Wife blocks.  I decided that I would like 2 - 10x10 in. and one 15x15 in. boards and made the cuts using a dull blade on my rotary cutter and a ruler.


After retrieving some batting remnants from the bin, I peeled off the adhesive backing and stuck the art foam board to the batting.


Using my ruler and rotary cutter, I trimmed the batting even with the edges of the foam board.


Et voila .... three mini design boards!


I decided to put the binding on the boards to protect the edges and cut 2.5" strips of fabric for the binding.   After pressing in half...


...I folded the edges to the center and pressed again.


I chose not to to the zigzag stitch down the center to hold down the raw edges because I'm essentially lazy.  Using my hot glue gun, I ran a line of glue down the center of the binding strip...


...and glued the binding to the edges of the design boards, overlapping the ends.


Next, I ran a ribbon of glue down each edge and glued the binding to both sides.


Lori Holt demonstrates this on her design board binding tutorial so check it out!


"Okay," you are thinking.  "What do I use these for?"

A mini design board would have come in VERY handy during the Civil War QAL, saving me from running between the sewing machine, cutting board, and computer as I tried to lay out the fabric pieces so I could sew them together without messing them up.   Lori demonstrates here:

 Photo courtesy of Lori Holt @ Bee In My Bonnet


Lori noted that you could arrange several blocks on the design boards, stack them, and then carry them to a sew-in without disturbing the pieces!

 Photo courtesy of Lori Holt @ Bee In My Bonnet

With Barbara Brackman's upcoming QAL honoring the fight for women's suffrage, I'm sure I will be using my new design boards!   Thanks for such a great tutorial, Lori!


Thursday, July 26, 2012

Up to Mischief Again


Bonnie Hunter was gifted with a beaded stiletto by Mary Tosch, who provided a clear tutorial at which I have been wanting to try my hand.  During my sister Carol's recent visit and our running around adventures, I was able to locate the turkey lacers at Bed Bath & Beyond.  (Nary a single grocery in these parts carried them!)  Of course, they were not the deluxe lacers as Mary used with the rounded ends...


...but with angled ends...

...that required some craftiness with beading tools.


After bending all the ends, I pulled out my beads and found that a lot do not fit on the lacers... however, I found enough variety to play around with...


...and came up with several different stilettos.  Now it was time for "fun with glue"...


I purchased the recommended glue (used a Michaels 40% off coupon to do so)...


...the glue is a clear gel and I only got a tiny bit on my fingers.  Then I started using the end of the glue tube to push the beads together after gluing.  (The glue squishes up between the beads... that's how it got on my finger.)


Following the tutorial, I used clothespins to hold the stilettos upright while drying; however, they were top-heavy so I propped them against various items on the kitchen table where I was being crafty.

Now for some fun!  Leave me a comment about which of the stilettos you like best.  Friday evening, I'll draw a number and send the winner their very own, hand-made stiletto.


~ ~ ~ ~ ~

Note:  No-reply commenters will be disqualified unless they leave their email address in their comment, like this:  yourname at email dot com (or net).  In this incidence, another number will be drawn. 


~ ~ ~ ~ ~

Stiletto uses:

When feeding fabrics when sewing...

Photo from Sew We Quilt with Petra

When turning tiny edges when ironing...


When sewing stuff onto something else...

Photo from CQMagOnline


Saturday, July 21, 2012

And the winner is....


....drum roll please...


Ms True Random Number Generator selected...


I have sent you an email, Mary, and will ship your prize to you as soon as I receive your snail mail address!


Many thanks to all who entered as well as all who follow my humble blog!  Quilters are THE BEST!


Thursday, July 19, 2012

Camp Grandma : The Finale


Today, my daughter learned to make peach jam...  and we put up 10 pints of the yummy-ness to take home with her...

  
...some for gifts and some for them to enjoy!

My three little girls left late this afternoon...   I miss them already...