Since picking up crochet this past summer, I've been doing a lot of yarn therapy.
It started with making a baby blanket for the couple across the street who welcomed their first child in late August.
Then I made a lap throw for a friend of my sister who fell and broke her hip.
When I visited her, it was the middle of the summer and this lovely lady was cold.... and I about melted in the room... the temp was set so high. So, after the lap throw, I made a small cape using this pattern...
....and this yarn, a teal-green and gray. (I forgot to take a photo before shipping it off.)
My sister reports that her friend uses the throw all the time and, now that the temps outside are falling, the cape is being worn as well. So I decided that Mrs. Claus needs to send a Christmas present.
I'm using this pattern..
...and this yarn: Victorian Rose
I started this project Friday after work.... and after a very l-o-n-g, l--o--n--g week.
I've done a LOT of crocheting this fall... and it's going to be a very crochet kinda Christmas around here. I'll post photos after the holidays.
To all my friends out there in Blogland... I think of you often. Life (mostly work) has tossed a lot my way this school year and it's difficult to keep up sometimes.
Despite work stress, I have much to be thankful for... including a new grandpuppy!
Wishing you all a wonderful Thanksgiving....
My daughter and family arrived at their beach house today and she sent me a photo of the stool covers....
She said they were easy to put on and added much needed color to the bar areas. If you look closely, the matching table mat is on the counter to the right.
I survived the school year and am now enjoying my summer break... aka: July! The first project I wanted to tackle was stool covers for my daughter's bar stools using THIS TUTORIAL (link).
After discussing her fabric choices with my DD, I found this fabric and ribbon on a road trip to Asheboro, NC.
I marked the 1" thick foam seat cushions...
...and cut those out (using electric knife) before beginning to cut the fabric.
The tutorial was easy to follow...
...and I even pinned the edges down before sewing the first seat cushion.
It was easy sewing down the edges with and without the pins so I stopped pinning after the first one.
The bodkin I have isn't as scary as the one the tutorial lady has and has worked well for over 40 years!
I cut a small slit in the inside edge and threaded that ribbon through each seat cover.
After evening up the ends of the ribbon (2 yds of ribbon per seat cover), I stitched through the ribbon opposite the small slit to hold the ribbon in the channel so it won't be pulled out by accident or come out during washing.
I "assembled" the seat cushions so that my DD could see what they are supposed to look like and showed her the easiest way to get them on the bar stools.
I also gave her 4 squares of the rubberized shelf liner to put on the foam before putting the stool on top to tighten the ribbon. These will help with the slipping-and-sliding factor of the foam on the wooden seat.
My DD is pleased with the seat covers and also with the coordinating quilted table mat (square place mat kinda thing) and fabric tray that I made for her with leftover fabric. No photos, sorry...
~ ~ ~ ~ ~ ~ ~
I use my summer break for all the things that need doing when I'm not working... exciting things like: getting the car serviced, mammogram, dentist, etc. I decided to have a portable project for those times when I'm sitting and waiting.... and also for these hot summer afternoons when I pop a movie in the DVD player and hold the sofa down.
These will be face/wash cloths to replace some that are worn and not so pretty anymore. At $1 each, these are way cheaper than buying wash cloths in the store, even with a 20% coupon!
No quilting going on right now... and I am going to visit my son and family this weekend. However, I do want to finish quilting the current project.... hopefully, it will be finished before July is over!
I finally got the next UFO pinned. Not sure why it took me so long. Mebbe because the quilt isn't a gift so there is no hurry. But could it a combination of "I'm getting older" and "Work is more stressful these days"???
I shopped my stash for backing and found this striped fabric, which I think goes well. A good feeling not to have spend more $$$ to finish a quilt.
Yesterday was a "nap day" and, when I wasn't sleeping, I was resting. Just 1.5 months left of this school year... hope I make it. I have a couple more heavy weeks then things will slow down some. More stress at work these days? Or just I'm getting too old for all this? Who knows...
I was able to get the blocks sewn together last weekend along with the backing fabric (found in stash) and picked up some white batting after work yesterday. Sandwiched last night, smoothing and pinning today...
Photo was taken without overhead lights, just the light from the window... I like that better. Definitely shows where the smoothing needs to happen...
Happy Saturday!
It's been a good week with a lot of relaxin' and unwindin' going on. Spending time with DD and family at the beach was lovely and just what I needed. I did a table centerpiece for them using shells the grandgirls had brought me and added a few that I had picked up this week.
I was able to finish a second dish cloth one rainy evening while we watched television.
Before I left to drive home, I also insisted on a photo op with my SIL and his new wall hanging.
Not thrilled about going back to work on Monday but... I will be relaxed and refreshed for the sprint to the finish (aka: the end of the school year).
Thankfully, this week is Spring Break for me as well as for my DD and grandgirls so we are all at the beach to relax!
We spent the afternoon actually on the beach yesterday afternoon... where the girls played in the sand and even went in the ocean. My daughter and I looked for shells... and my SIL got in a nap.
I also had some time to crochet a wash/dish cloth and... as promised, Shelia... here it is!
I'm slowly relaxing... very slowly. Feels good....
I have to say that finishing up a wall hanging goes a lot faster than a quilt! Sandwiching/pinning went smoothly as did the quilting. Using blue painter's tape I marked lines to sew...
I used a grayed variegated thread (has soft yellows, blues, pinks, & gray and blended well, I thought) for the radiating lines and a dark green to outline the cross (stitch in the ditch).
The backing is leftover batik from the last quilt I finished and I did the corner-pockets thing to hold the sawed-off yard stick that will serve as a hanger.
The wall hanging is 21.5" wide and 42.5" long.
This quilt has taken on a life of its own. The colors change with the available light, whether natural or artificial.... and as you look at it from different angles. It's definitely greater than the sum of the parts.
I will give this to my son-in-law Jason on Easter Sunday.
Using the fuse-squares-to-interfacing method of assembling a top certainly makes the job go more quickly... especially since it was important to have the right square of fabric in the correct location.
It's amazing how much "shrinkage" you get after sewing 10 seams across the width.
After finishing all three sections, I match seams and sewed the sections together.
Now to get this sandwiched and quilted!
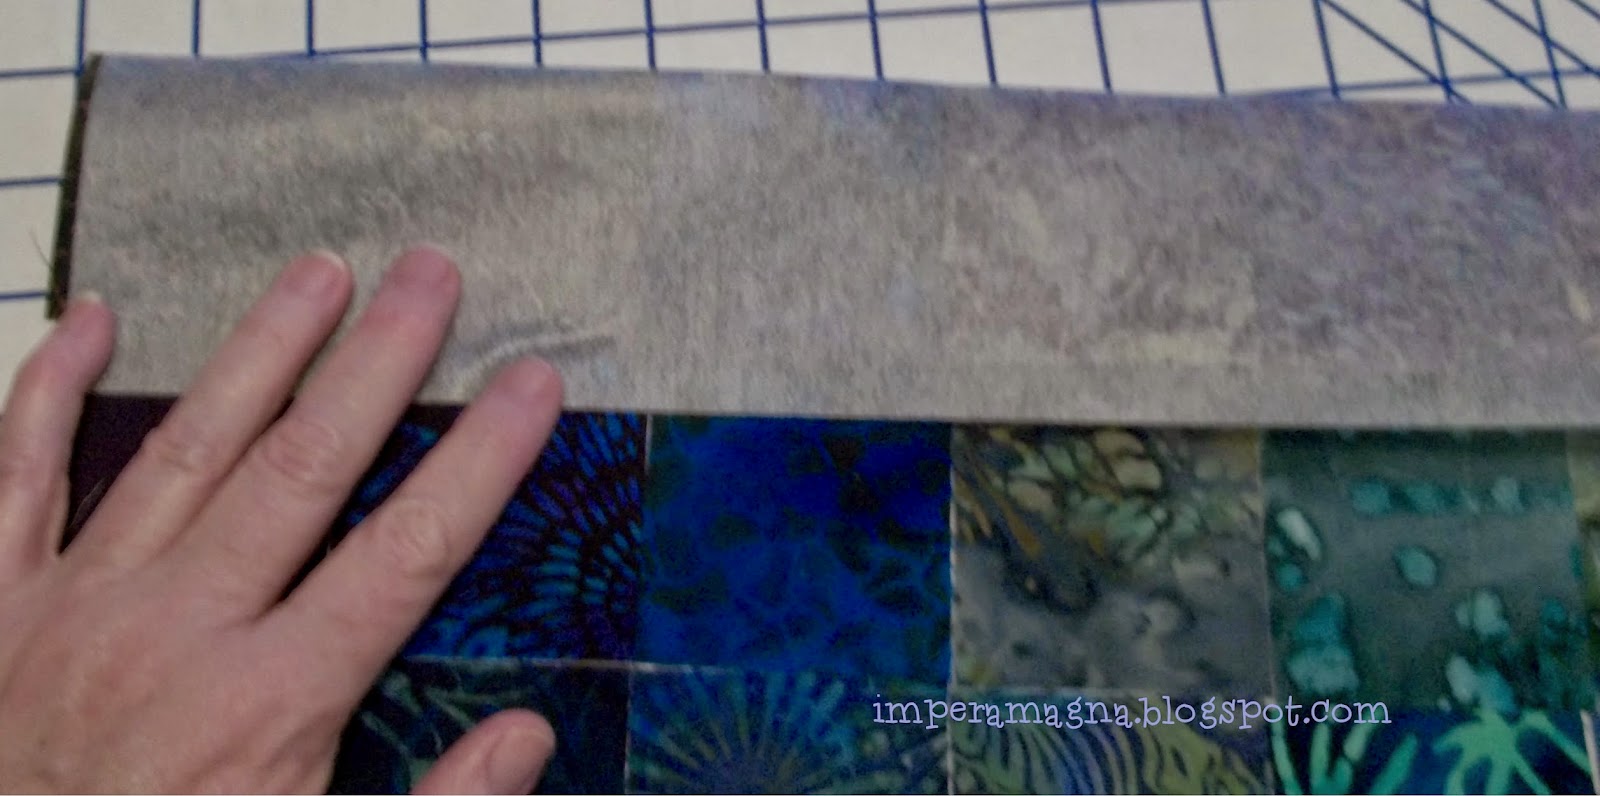
Since a blogging buddy asked, I thought I'd take photos of the process of sewing the interfaced 2.5" squares of batiks. Starting with one section of the project...
...fold over one row of squares.
Sew a quarter-inch seam along the folded edge.
Next fold over the second intersection of squares and sew a quarter-inch seam.
Repeat until all intersections are sewn in one direction.
Now, snip the seam at the location of each intersection of squares going in the other direction. This will allow you to alternate seams to reduce bulk.
Fold fabric along one intersection and sew a quarter-inch seam, alternating the seams.
Continue to fold and sew intersections until all are completed.
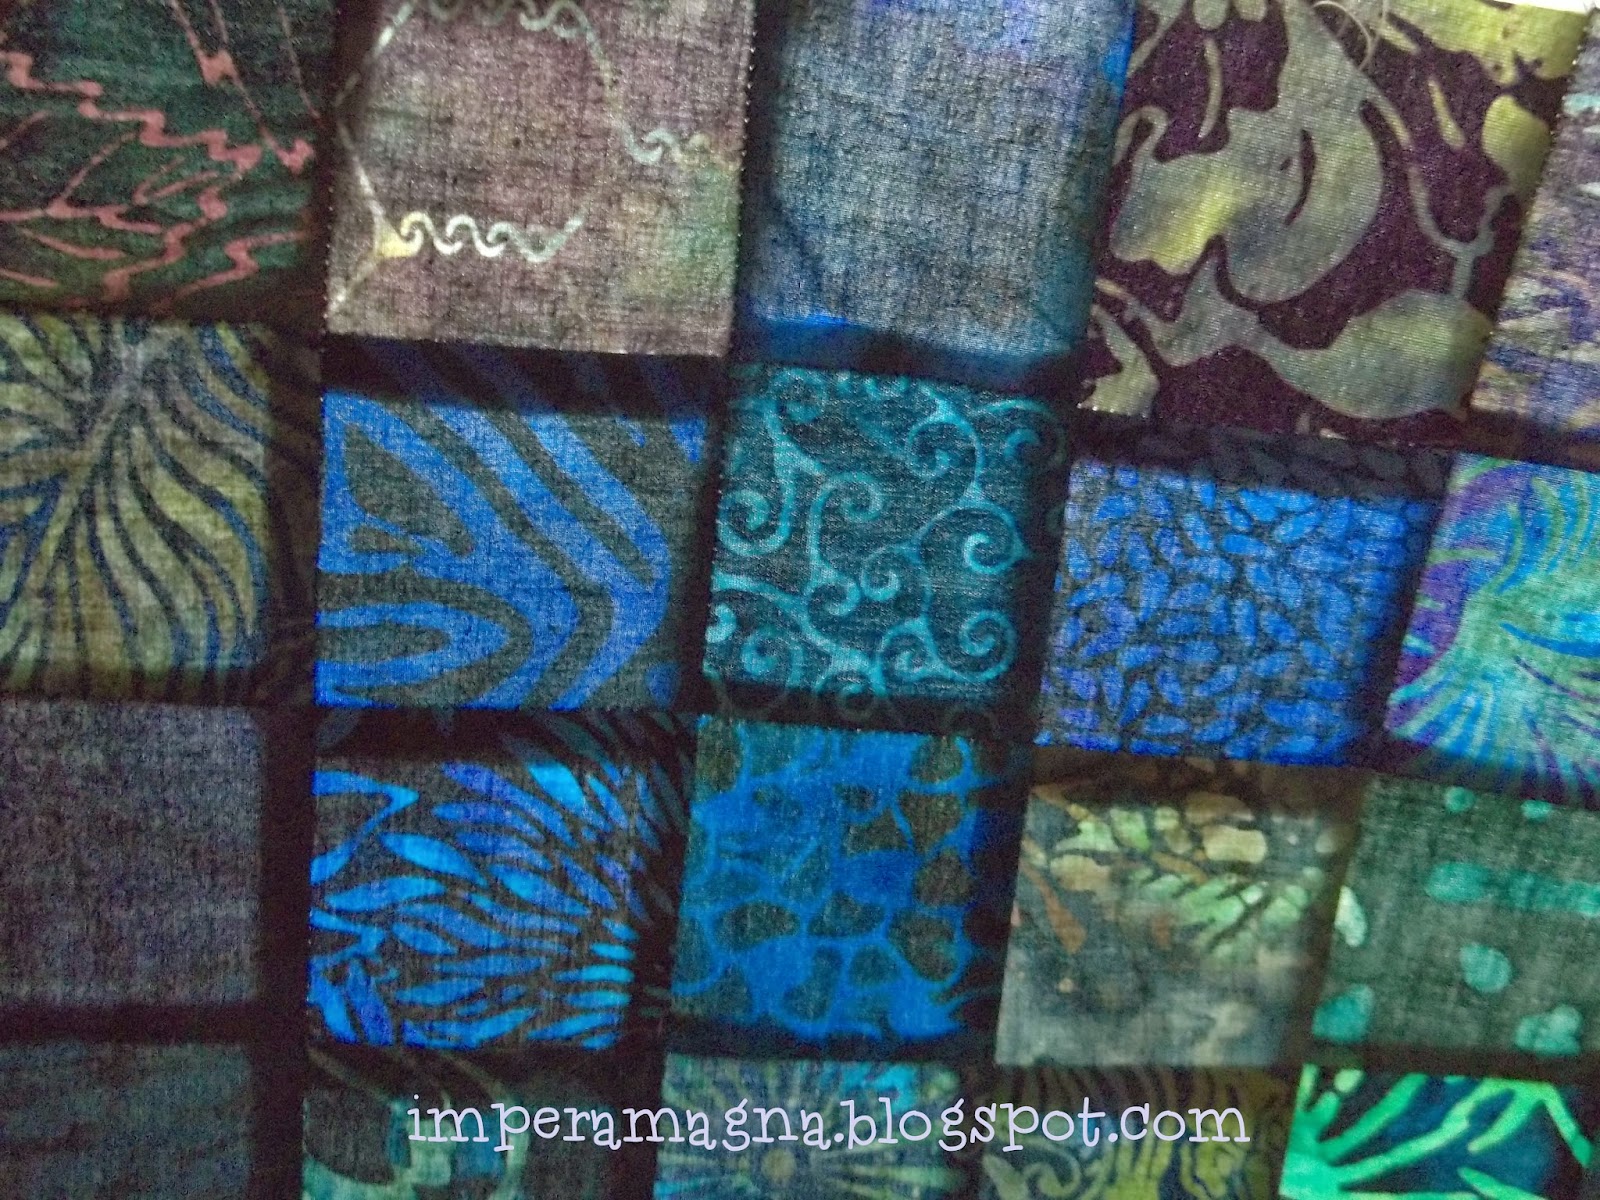
Press from the right side... or from the back using a pressing cloth.
And that's how it's done! Sun shining behind the pressed section makes it look like stained glass, yes?